BLOGGER TEMPLATES AND Google Homepages »

Tuesday, April 22, 2014

I DANCE in the RAIN

It's never been a secret: my love of the rain.  I love the way it smells, I love the way it sounds, I love the way it feels...    ~ I DANCE in the RAIN ~


~ Today, it's raining... I often think how smart two of my doxie pups are when they choose to "go" under the trampoline ~ it's like a big umbrella for them.  Meanwhile, it's my Molly who just stands around taking her time in the rain ~ today I noticed her close her eyes and raise her head to the sky...

Just the other day I was talking with my sister about my love of the rain. My niece was walking around in it, hands stretched out with her face to the sky, letting the rain droplets kiss her face. She gets that from me, my sister said... because I do that also, every time it rains...

So today, I looked at my Molly in a new way... she just wanted to feel the kiss of the rain on her face too. Afterwards, she frolicked around for a few minutes as if feeling rejuvenated.
Rain does that for me too... 

When I was about to go inside, I noticed the cat sitting by the screen door in the same position she's always in when we go outside. And immediately I thought, she wants to feel that too. So I scooped up my sweet indoor kitty and took her outside. I held her in my arms. She sniffed around and then tilted her head back to the sky and she closed her eyes for a moment. Then she gently mewed. I'm not sure if that "mew" was thank you or take me back inside... I'm curious to see if she waits by the door next time...

A few years ago, I took my son out  for one of our special mother/son dates. It was raining when we got home. He paused and let the rain kiss his cheeks. I asked him if he wanted to dance in the rain and so we did. His smile was radiant. He said it was the best day of his life. ~One of mine too, buddy...

❤ "Anyone who says sunshine brings happiness has never danced in the rain". ❤

Monday, January 6, 2014

Arctic Georgia ~ A snow day without snow

Okay, so I have been reading lots of funny posts about how us southerners can't handle the cold ~ making fun of us for shutting down schools for cold temperatures. Here's my answer to the posts ~ we Georgians aren't prepared for Arctic temperatures!! When you can wear flip flops throughout most of our "winter", we don't all invest in "arctic" coats!! Truth is ~ I don't even own a coat! lol! I wear one of my husbands once or twice a year when needed. So here is this Southern Gal's solution to the Arctic weather that we are experiencing ~~ Layer up a few of your sparkly tanks, throw on a sweater, wrap a few of your fashionable scarves around your neck, pull out those "toe socks" that you were given as a gag gift and put on your flip flops!! We got this, y'all!!

#truesoutherngalproblems
#wewearflipflopsallyearlong
#Ihavebetterusesformymoneythanbuyingacoat
#lovegettingtosnugglemykidsonasnowdaywherethereisnosnow
#notsurewhathashtagsareforbutfeltlikeplayingalong

Friday, January 3, 2014

A simple tutorial ~ how to turn a onesie into a doggie t-shirt


Okay, here's a super easy tutorial for you to make an adorable t-shirt for your special pup!!  
~All you need is the following:
     1) A onesie 
     2) sharp scissors (be careful!)
     3) needle & thread OR *sewing machine and thread if you want to sew a hem along the bottom.  You could also use no sew hem tape :)

Step 1~
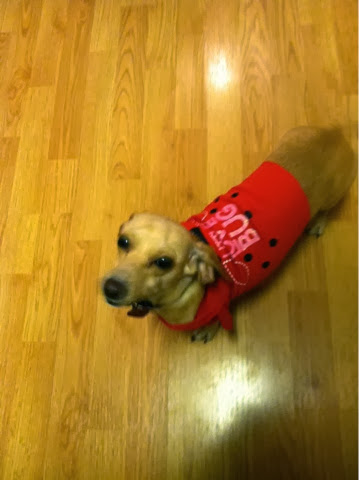
Pick out the onesie you're going to use!  I paid $3.50 for the one pictured at Walmart ~ my Chloe weighs 9 pounds so I got the newborn size. You could also pick one up a thrift shop ~ it doesn't have to be new!  I just had to have this shirt because I call my Chloe, my love bug!  So it is perfect!  (If you are planning on sewing a hem at the bottom of your shirt, wash and dry the shirt first)   Now, that you've picked out a onesie, remember that the front of the onesie will go on your pup's back ~ yes, they wear it backwards!  I put the onesie on my pup to determine how much to cut off.  Then just cut the bottom of the shirt off where desired!


Step 2 ~
Flip the shirt over and cut a contour shape (see photo) on the back of the onesie so that the shirt is shorter on the underside of your pup's tummy :)

Step 3~
Sew it as desired ~ I personally only sewed by hand over the part where I cut through the side seams of the shirt to reinforce the original seam~ and I only did it as a precaution to keep it from possibly unraveling
**If desired, you could use no sew hem tape OR a sewing machine with matching thread to add a seam along the bottom of the shirt.  

Step 4~ put it on your pup!!
Isn't my Chloe Bug adorable?!

Maybe your pup will "bark" his/her sign of approval when you're done!!   My Chloe Bug did!

And now to make a couple more... I have 3 doxies after all!!  <3


Come check out my handmade jewelry at www.facebook/mustlovetiaras 
www.mustlovetiaras.etsy.com

Hope you have a SpaRkLy day!!  <3

Wednesday, July 10, 2013

Spread Sunshine <3

I saw this today.... LOVE it!!  <3

Monday, January 7, 2013

Truth is.. I'd rather have clutter!

"Truth is, I'd rather have clutter..." (moms especially, please read)
I've been annoyed by the clutter in the house over the last few weeks, actually it ALWAYS bothers me! I try to tell myself to just relax and enjoy life... That if I spend all my time cleaning all the clutter, I'll miss my children growing up. Most days I manage and then occasionally I have a meltdown. Yes, I have clutter! Lots of clutter... The living room is always home to blankets and pillows and toys and shoes and school papers... The kitchen almost always has a cup on the table or one in the sink. My kids' rooms are not perfect, my room is not perfect... Probably nothing is ever perfect. And it bothers me... I have heart palpitations at the thought of company... And that must change! My New Year's Resolution is to just relax and enjoy it! My babies are growing up so fast! Now, don't get me wrong... We'll still clean up, but I'm not going to waste all my energy worrying over it... I don't want a messy house, but I'm also not going to expect perfection anymore! Because the truth is... I'd rather have clutter! I took this photo today to remind me of this... For weeks this little nook in my foyer has been cluttered with backpacks, coats, hats, scarves, a trumpet case, shoes, etc. AND it has driven me nuts to look at it and walk past it. Until this morning... And this is what I saw... One lonely scarf. The kids went back to school. There were no giggles and laughter in the living room, no whispers down the hall... So looking at that one lonely scarf made me cry. I'd rather have clutter! One day I won't have 3 little children to mess up the house, to leave fingerprints on my glass door, to clutter up my fridge with art... And I'll miss it! I'll long for it... So today, I'd rather have clutter and I can't wait for my kids to get home to mess up the house! So be prepared friends... When you visit me this year, you'll most likely see clutter! And that will mean that I'm relaxing and enjoying life!!! And most importantly, I'm enjoying my kids!!! ♥

 
Please check out my facebook page - https://www.facebook.com/mustlovetiaras?ref=hl

Tuesday, June 19, 2012

Hand Stamped Coaster Tiles Tutorial

Hand Stamped Coaster Tiles

I'm so excited to share my very first tutorial with you!!
You only need a few things to make these!!  AND it is super simple so anyone can do it!

Supply List
4x4 stone bathroom tiles (I purchased mine at Home Depot - 9 tiles in a pack for just under $5 - some are more porous than others so I tried to get the ones with less holes)
StazOn solvent ink pad (about $7 at Michael's but use a coupon or wait for them to go on sale-- I got mine for about $4 and I used JET BLACK.  Don't skimp on the ink pad!!  This is permanent and works on EVERY surface-- you'll use it over and over!)
Stamps (I like the clear acrylic stamps because you can see where you are stamping!!  I bought mine on clearance at JoAnn's a few years ago.  You can use any stamp you like... I plan on making more for gifts this holiday season with monograms!)
Felt (felt circles can be purchased OR you can get sheets of adhesive backed felt like I did -- only 99cents at Michaels and I was able to cover the bottom of 6 tiles with one sheet)
Ribbon, Twine, Tulle... (This is optional but it looks great if you are going to give them as a gift!  I used brown tulle because I have two little princesses and we ALWAYS have tulle!)

ARE YOU READY??
Step 1:  wash your tiles (remove all the powder so the ink will adhere to the stone!)
Step 2:  Once the tiles are dry, decide what and where you want to stamp!! 
(Since I LOVE items that have a multiple purpose, I chose to make TIC TAC TOE tiles!!  My kids LOVE playing with them and it distracts them when I am in the kitchen!  Win, Win!!)
Step 3: Carefully stamp your design and press down firmly!!!  I used a lot of ink!!  Let them dry completely... which if you are impatient like me, it only takes a few minutes!!)
If you choose to make tic tac toe coaster tiles, I stamped the outer corners first and then one in the center.  I then switched out another square stamp and stamped in between-- see photo below for reference!)
Step 4: Some other tutorials tell you to spray your completed tiles with a clear coat or modge podge... I wanted my tiles to have a natural finish and to actually be as absorbant as possible, so I didn't seal mine!!  And I tested them!!  I soaked them in water and even scrubbed them with a brush to see if the ink would come off... it didn't!!  Just another reason NOT to skimp on the ink pad... use StazOn!!)  Okay, so that actually wasn't a step!  ;)
Step 5:  After your tiles are completely dry, put the felt on the back.  If you bought felt circles, put one in each corner.  If you bought the felt sheet like me, cut the felt to size and remove adhesive backing and stick it on.  You can also glue regular felt on... whatever is easiest for you!
Step 6:  Optional --Stack up your tiles (I chose to do 4) and tie with a ribbon!!  These make great gifts!!!
We are really enjoying our Tic Tac Toe coaster tiles!!
I made them!!  They are pretty and functional!!  AND.... the kids get to play with them!!  Awesome, right?!!  The only problem is that I have 3 kids and Tic Tac Toe is a 2 person game... so sometimes, one of my poor doxie pups is recruited to play!!  ♥
((See my little Chloe Belle in the bottom right hand corner photo...  she was recruited!))

We use dimes and pennies to be our X's and O's... please use your best judgement when selecting what to use... I don't want the coins to be a choking hazard for your kiddos!!  There are many things that you can use other than coins!!!

Oh, I had an extra tile left over after making 2 sets of 4... remember, they come in packs of 9!
So I made on for my office!!!

I hope you enjoyed this tutorial... I'd LOVE for you to pin it on Pinterest!  ♥

You can also find me on Etsy... http://www.etsy.com/shop/MustLoveTiaras

AND... I'd LOVE for you to become a fan of Must Love Tiaras on Facebook!


Friday, June 8, 2012

Must Love Tiaras: FREEbie Friday

Must Love Tiaras: FREEbie Friday